
Building a campfire and eating well
For a campfire, you need fuel (dead and down or store-bought wood), an ignition source (matches), and air (all around). Sounds simple but there are some tricks that as a novice camper you might not realize. One thing you’ll want is variety in the size of your kindling. Look around and collect dry grass, twigs from dead branches and some bark (good activity for children). The key is DRY kindling. There are numerous videos on YouTube about campfires but simply put, you forming a small pile with the smallest size kindling in the campsite’s fire ring. Add the ignition source (a lighted match) and gradually add wood from the smallest to the larger diameter material.
There are two campfire designs, tepee and crisscross, I find useful. A tepee fire design is good for building quick fire since the heat is concentrated in one spot. You simply stack the wood around your burning kindling like a tepee. The crisscross fire design is good for a long-lasting fire with a lot of coals, good after a dinner campfire. All you do is place the wood around the burning kindling in a crisscross pattern, like cabin walls, and lay a flat roof on top.
Remember you are making a campfire, not a signal fire, so keep it small and efficient.
One of my problems with cooking as a novice camper was judging the temperature. Here is a trick I’ve found useful. Hold your open hand close to the cook surface, but not so close you burn yourself, and count “one-thousand, two-thousand, etc.” until the temperature comes unbearable. A count of six to eight means the cook surface has a temperature range of 250 to 300 degrees. Four to five means 350 to 400 degrees. Two to three count means 450 to 500 degrees.
Another method is a pinch of white flour on the skillet or griddle. If the color of the flour is unchanged after five minutes, your skillet’s temperature is less than 250 degrees. A golden brown means up to 350 degrees temp and 400 degrees gives of dark brown.
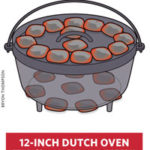
Once you have mastered cooking in a Dutch oven, you’ll have the world at your feet. In my opinion, Dutch oven cooking is a superior culinary cooking style. I’m still developing my Dutch oven skills. If you can find someone who offers classes in this cooking method, IMHO it will be worth the investment.
A quick word about temperature inside your Dutch oven – it’s all a matter of coals. The Dutch Oven Dude has been my source for all things related to Dutch ovens. Here is a link to a set of guidelines he gives for obtaining the temperatures you need.

Frankly, a properly seasoned Dutch oven is a thing of wonder. The method of seasoning is the same you use for seasoning a cast iron skillet but how many of us have one of those things? Again, the Dutch Oven Dude has a good set of instructions for successfully seasoning your oven (or cast iron skillet). Just remember, once your oven is properly seasoned, never use soapy water to wash it. My preferred method of cleaning is to add a couple of inches of water to the oven and set back on the fire until the water starts to simmer. Then I’ll use a rubber spatula to scrap any food bits off the oven’s surface and pour the water oven my cooking fire. Once the oven cools down a bit, I’ll wipe the inside out with a dry paper and let cool completely before putting away.
Some recipes require monitoring the Dutch oven for a while, adding hot coals as needed. For those occasion, I bring a book and my knitting and enjoy.

Two foods perfect for campfire cooking are corn-on-the-cob and s’mores. After eating an ear of corn roasted over a campfire and you’ll wonder why no one told you about this delicacy. The trick, I think, is brining the corn. This means removing the husk and silk from a fresh ear of corn, slips it in a plastic bag or large container. Add enough water to cover and add a pinch of salt. Let soak for no less than 30 minutes and no longer then two hours. Remove the corn from the brine and place on a moderately hot (350-400) grill (you can rub with oil but not necessary). Grill for 10 to 20 minutes, turning often until corn is tender and nicely charred.

The art of roasting a marshmallow to perfection might be one of the most important camping skills you can learn. Each person must develop their own technique and it comes only with lots of practice. So bring a big bag of puffy marshmallows, a box of graham crackers, and as many chocolate bars as you can. Then, every night, after dinner, work on perfecting your marshmallow roasting skills. The variety and variations of s’mores are incredible. I’m more a traditionalist but do a search on the web for some innovative recipes.
Next week, where to camp?


Wow. You really put a lot of thought and effort into your posts. Good information!
Thanks for the comment. I'm afraid I got rather wordy there but hope others will be able to benefit from my failures.